Showing posts with label crochet. Show all posts

Saturday, January 15, 2011

I did it

Remember this post, from a couple days ago?  Well I couldn't resist.  We were going to be in the mountains and snow all day today, and I had to make my man a better hat, one I was more proud of, before we headed out.  I am quite satisfied with the results.  The reports are that it is very warm (possibly too warm, I did use wool for the hat).  the Face fur is nice and soft, I used that hairy yarn, and I must add, it is very difficult to crochet with, because it is almost impossible to find the hole to stick your needle in.  I wanted to make one, to say I could do it.  However, I will probably not do it again with the hairy yarn, because it was a pain.


For the hat, I pretty much just did continuous rounds of half double crochets (I did not even do a slip stitch to join the rounds, because my seams are always so obvious, so I decided to bypass them).  I started with 8 hdc in a loop, then did 16 hdc, followed by 24, 32, 40, 48, and 56.  Then i did the rest 54.  until I felt it was long enough.  I don't even know how many rows I did.  and the yarn was really really thick, because I originally followed a pattern for worsted weight yarn, and I was supposed to go all the way up to 72 hdc, and it was huge! I had to unravel it and just figure out how many worked for me.

for the beard, I bought the $1.99 pattern I previously linked to on Etsy
Posted by Picasa
HouseofHepworths

Thursday, January 13, 2011

another crochet hat

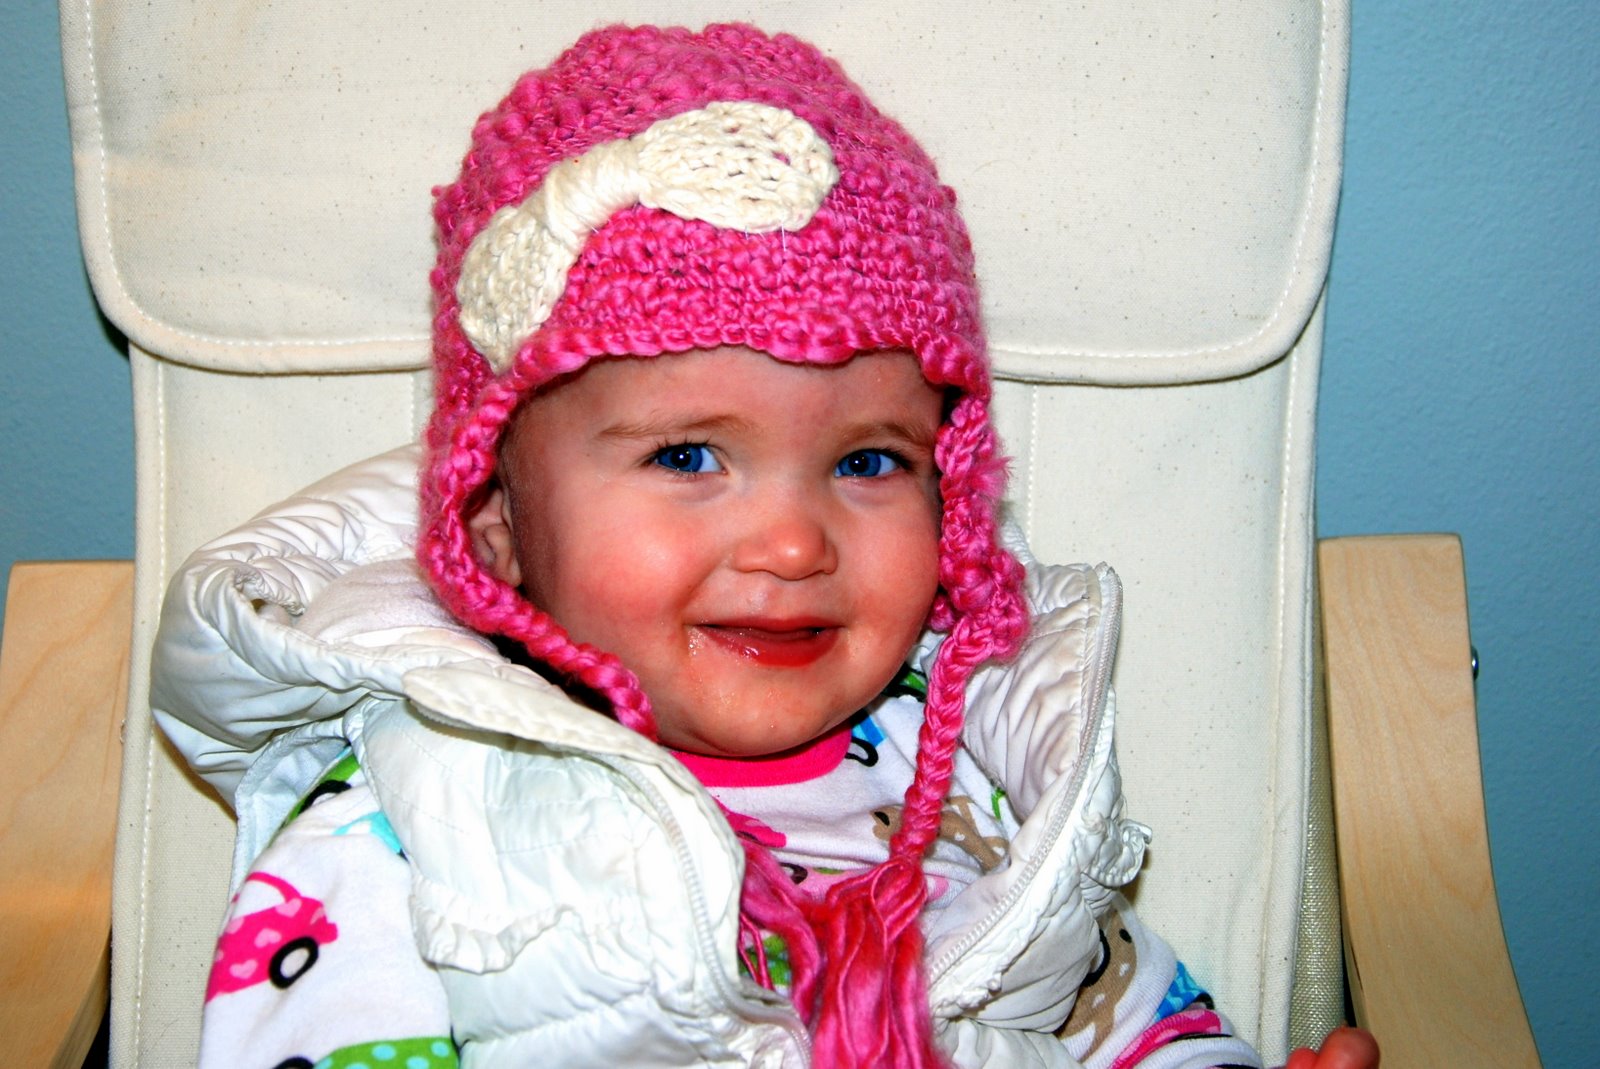
My girl LOVES hats.  The first thing she does when she wakes up, is finds a hat to wear.  Then she will giggle and laugh when she puts it on, and say "hat" while patting her head, over and over again.  So I could not resist making her one, and you know what? She has not taken it off since I gave it to her three hours ago.


I basically followed the hat pattern here, minus the ears and face.  I used a size k hook, instead of a J, and I followed her instructions for a bigger hat.  then I used instructions from this hat to do the flaps and the tie's
finally, I followed instructions here for the bow, and sewed it to the hat.  You could also do a flower, or a ribbon.

I only had one problem.  I really like textured yarn lately, so I used this yarn that I got for only $1 in the clearance bin (that is right, this hat cost me $1 and about and hour and a half of my time, while I watched a movie).  Since this yarn is thick in some places and thin in others (not the recommended worsted weight, for the pattern) I had to make adjustments for the size.  In fact, the directions I just gave you ended up making a small hat, too small for my 18 month old.  But it fit my 9 month old niece great.  So I made a second one for my 18 month old, making it bigger this time.


I know the texture may look sloppy, but I like how it turned out.
Posted by Picasa

beard hat

so I saw this and knew I needed to make one for my husband.  I emailed the seller and asked if she would sell me the pattern for just the beard, and she respectfully declined.  so I searched and searched for a pattern, and I could only find one on etsy (I am not linking it, because I do not recommend it).
  It was very different from other patterns and hard to follow.  i also did not really like the end result, and I ended up having to do a lot of altering to like it.

 so then I decided to make up my own.  Although i really like how this one looks, I do not recommend it, it took me so long.

I have since searched etsy again, and there are now multiple beard hat patterns.  I think if I were going to do it again I would buy this one. and maybe I would use some "hairy yarn" and make it look like this

I am definitely going to have to make a new one, a much better one.  I will show you the end result when I finally get around to it 
Posted by Picasa

Monday, November 1, 2010

more baby blankets and accessories

I know I have already explained how to do the receiving blankets, but I thought I would show the ones I made today.  
This one is for a friend, whose sweet new baby had to endure the NICU (having experienced it, something I would not wish on my worst enemy).  and a couple eye surgeries as well

This set is for a good friend who just had twin girls.  Don't you LOVE Amy  Butler fabric? I sure do!  Her little girls also had to be in the dreaded NICU, but are home now

This set is for a baby shower tomorrow, but I don't think she reads this blog, so I feel safe posting it.
I followed this tutorial for the baby legs, but I found this one later, that I want to try next.

I have posted about the crochet baby hats before but this time I found a free tutorial (plus she has other great tutorials), I thought you might want a link to a free one, and it literally took me exactly 61 minutes to make, not bad huh?

For the Onesie, I just used some of my ruffle fabric.  I cut it how long I wanted, measured it 2x as wide as the onesie, and put it right sides together, sewing one quarter inch seam (making sure all ruffles were hanging down), making a tube.  Then I just folded the top over and sewed it on the onesie (I did not need to hem, because it is knit and does not fray).  I lined the one seam up with the side seam on the onesie.  sorry if this is confusing, I did not take pictures, but it was so easy.

For the burp clothes, I just sew on random fabrics, ribbons and embelishments, there is really no rhyme or reason to it, I usually don't even have a plan when I start.  I just want to say that I only like the tri-fold birds-eye ones.  I got the wrong kind once, and hated them.  I get mine at Target, and they are Gerber brand, they come like 12  in a pack I think.  Also, MAKE SURE TO PRE SHRINK THE DIAPERS! Wash them in really hot water and dry them in a really hot dryer.  It is the pits to make an adorable burp cloth, only to wash it and have it way smaller than the fabric you sewed on.
Posted by Picasa

Monday, April 5, 2010

crocheted booties

I bought the patterns for these booties on Etsy, and I really liked how they turned out. I made some for my expecting sisters, and am half way through making some bigger ones for my baby. Sorry I cannot give you the patterns, but you can search Etsy.com in the baby crochet patterns to find these, and many other cute patterns.


Posted by Picasa

Monday, January 25, 2010

baby boy hat

Found this free pattern online and made this baby boy hat for a neighbor. It was really easy, I decided to use all one color, and omit the monkey ears.
Posted by Picasa

Wednesday, December 23, 2009

crochet scarf tutorial

okay, so I will do my best to explain how I made this. I have never written a crochet pattern, so someone familiar with following a lot of crochet patterns may think I did it all wrong, but I will try to at least help you get the end result, without too much confusion.
I used a size k crochet hook, but you can fiddle with it, I probably wouldn't go smaller, because the flower will get smaller as you go to a smaller hook. I have not tried a bigger one, it may produce a fuller looking flower, but it may have too much "empty space" if that makes sense.
you can use any yarn you want, I always thought the fuzzy yarn would look cute, but I have a hard time seeing one crochet from the next when I try, so I took the easy way out. (By the way, I just used 100% cotton, worsted weight 4-ply yarn)
First, ch. 5 and slip stitch to form a ring
ROUND 1:ch 1, work 9 sc into the ring, join with a sl. st. in first sc to form a ring
ROUND 2: ch 1, 2 hdc into each sc around (18 hdc), join in first dc
ROUND 3: ch 1, sc into each hdc around (18 sc), join in first sc
ROUND 4: ch 1, 2 hdc into each sc around (36 hdc), join in first hdc

the end result should look like this

next, ROUND 5: ch 1, sc in same hdc as joining, *ch 6, sk next 5 hdc, sc in next hdc; repeat from * 4 times more, ch 6 sk next 5 hdc, join with sl st in first hdc (6 ch 6 sps)

it should look like this

ROUND 6: in first ch 6 sp, (sc, hdc, dc, 3 tr, dc, hdc, sc), repeat in all 6 ch 6 sps, join to first sc

Next, I don't really know what this is called, but I slip stitched vertically down until I reached round three (about three sl sts)


ROUND 7: ch 1, sl st around post of sc on round 3, *ch 3, skip next 2 sc on round 3, repeat from * 4 times, ch 3 skip next 2 sc on round 3 join with a sl st on first sc (6 ch 3 sps)
in first ch 3 sp (sc, hdc, 3 dc, hdc, sc) repeat in all ch 3 sps, join and fasten off


your flower should look like this

I make 10-12 flowers (you decide how long you want the scarf, try it on and tie it how you like to decide length) on the last two scarves I made, I just got a needle and matching thread and sewed the flowers together, petal to petal, by hand. On the second one I made, I crocheted the flowers together, petal to petal, usling a slip stitch (this worked fine, but took a long time). On the first one I made, I crocheted a back piece (by doing rows of 8 hdc, ch 1, and turning). Then (having left a long tail in each flower) wove the flowers onto the back piece with my crochet hook. I liked the fullness of the first scarf the best, and since it looked more full, I only made a single layer flower for each flower, rather than a double. However, this took me a really long time to make the back piece, and a lot of yarn, so that is why I have by passed it on the other three scarves. I made 12 flowers on the first scarf too, 11 on the 2nd and 3rd, and only 10 on the last one. I also did 7 petals on the first 3 and only 6 on the last one (I am still trying to figure out the best pattern, one that looks good, but doesn't take forever to make). I can make about 3 of the flowers shown in this post in one hour, to give you an idea


this is a very forgiving pattern, it doesn't matter if all your flowers are slightly different, or if one of your rows ends up with more crochets than it should, just adjust your pattern and keep going. Once the flowers are all hooked together, you can't tell where mistakes are. Also, it doesn't really matter if you can, because the flowers don't need to look exactly alike. Just use this pattern as a guide line, figure out what works for you, where I made mistakes (or where I wrote the pattern confusing) and just dive in a try.
Posted by Picasa

Monday, December 21, 2009

crochet hats

I wanted to make my baby one of the cute flower crochet flapper hats, so I hopped on Etsy and found the pattern here. Since I bought the pattern, it wouldn't be fair for me to tell it to you, but there are so many cute hat patterns, and just crochet patterns on etsy.
I wanted to be able to switch the flowers out on the one for my toddler, so I made a white one, with five different color flowers, and hot glued some pins to the back, I am happy with the result.

here are some more I made with attached flowers

I actually completely did this one wrong, and I did a lot of finagling to make it work, but it the end, it looked fine on my baby, and I learned a lot in the process.
Posted by Picasa

Wednesday, December 16, 2009

crochet scarf

My cute Nana (grandmother) always tried to teach me to knit and sew growing up, I was never interested, it was always way to old-fashioned, boring and girly for me. Well, about a year or two ago I wanted to learn how to crochet the edges of receiving blankets, so I asked my neighbor Heidi to show me how (she had given me some burps for my own baby). Until recently, this was the only crocheting I did, and knew how to do. Well, one day I found a cute pattern for a baby beanie and I wanted to learn how to make it. I figured I knew a lot of the stitches, so I just bought the pattern, some yarn and crochet hooks, and I went for it. It was a lot of trial and error (I think I made about 5 hats before I figured out I was doing them all wrong) I googled a lot of terms, and I watched a lot of you-tube demos, but I figured it out, and I was even proud of myself for doing so. I showed my older sister my first hat, and she told me that she wanted a flower scarf. I decided to take on the challenge. I had no idea how to make one, but I owned one, so I went home and studied it. My hubby was out of town, so every night for a week I put the kids to bed and crocheted and then unraveled dozens of flowers. I finally got it down and made my sister the following white scarf. I made the brown one for my other sister, and made a third one (not pictured) for my third sister. I liked the last one the best. I finally think I have it down, so next time I make one, I will try to post some kind of pattern for it


I am quite happy with how they turned out. However, these take quite a while to make, so if you get one from me, I must really love you
Posted by Picasa